This post may contain affiliate sales links. Please read my disclosure policy.
One of my favorite parts about the cake that I recently made for my mom’s birthday is the personalized things written on the fondant around the top layer. It made the cake special and it made my mom cry. Rock on.
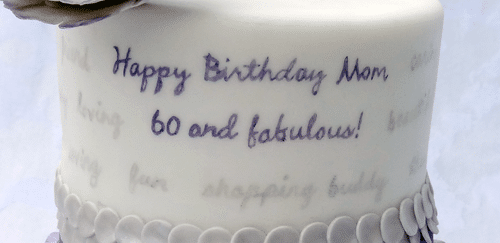
However I was slightly terrified of actually writing onto the cake, since my handwriting tends to be messy and slanted without a line to write on. So I came up with a way to write on the cake in a pretty font. If it seems hard or intimidating, trust me, it’s not. And it actually went pretty quickly.
Check out the tutorial below. I hope you find it easy to follow. Feel free to ask questions if something isn’t clear.
1. I started off by measuring around the cake to see how much space I had. I got the length around and the height of the area I had to work in.
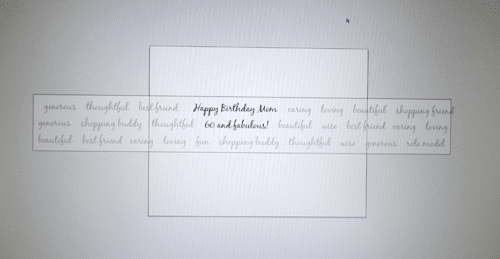
2. I created a box that was the size of the space I had to work with and wrote out what I wanted the cake to say. I used a program called Adobe Illustrator, but any kind of painting or drawing software that you can make a box and type text in will work.
Note: In the image above, the light grey text was actually changed to black before being printed so that it was easier to read.
3. Print out your text. I printed it in 3 sections, since it was longer than an 8.5 by 11 sheet of paper and then cut them down to the right size.
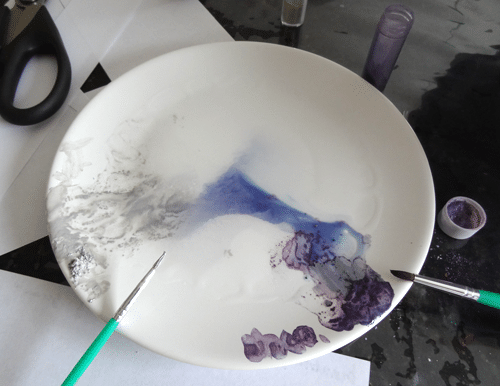
4. Mix some pearl dust with a little vodka to make your “paint.” I kept it fairly thick so it would show up better. I put the pearl dust on the edge of the plate with the vodka in the middle so I can just dip my brush in when I need more moisture.
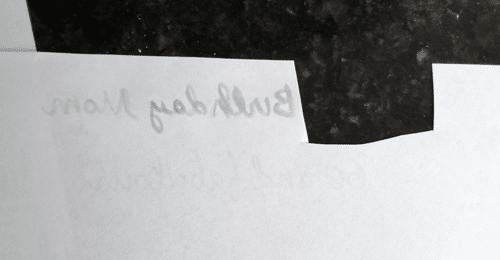
5. Use your “paint” to trace the back of the words on the paper. It will be backwards (the word above is “birthday”). I did one word at a time, otherwise the “paint” would dry before I could get it onto the fondant.
6. Press the painted side of the paper onto the cake, making sure to place it in the right spot. Press down on the area where the “paint” is to get it to come off onto the fondant. It should give you just enough guidance to be able to go back and trace it with your paintbrush.
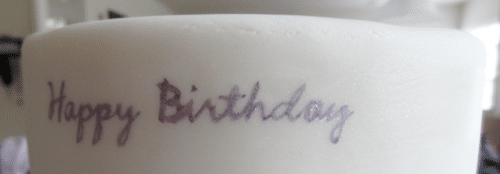
7. Trace over the word with darker paint and walah! You have beautifully done text painted onto your cake!
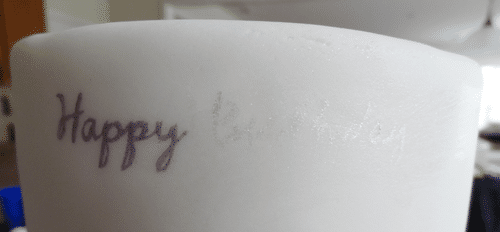
Another note: As I went along, one word at a time, I would cut off the word that I had previously done. Which is why you see a gap in the picture above. I had cut off the word “Happy”. I did that for 2 reasons:
1. I didn’t want to smudge the words that were already done.
2. If you cut it just on the edge of the previous word, you can line the edge of the paper up with the end of the word you last painted and you should get correct spacing between each word. I hope that makes sense.
Again, if you have questions, feel free to ask!
As always, thanks for reading!




Lindsay, you are a genius, thank you!
Thank you!
Have you used this method with shapes and graphics on a cake?
I haven’t, but I’d imagine it’d work with smaller pieces or breaking up something into smaller pieces.
Neat! I’ll try this.
Also, it’s voila, not walah. It’s French. lll
Thank you Eowyn. That was bothering me and now I don’t have to tell her!
Would this work using gels instead of pearl dust?
I haven’t tried it. I would think if the gel is thick enough you could paint it right on with this method.
Do you think this would possibly work on American buttercream (crusting buttercream)?
Possibly. I think it could work.
Hello , I’m from Brazil , and loved his technique . I will do … thanks. kisses
Hi…Can we use any other thing than vodka to male paint?i wanted to write on newspaper cake
Yes, vanilla extract or another flavor will work.
Lindsay, This is beautiful cake. Your idea is great; I will try it and send you the picture.
Thanks so much
Thanks so much for sharing, I’ll try it out on a cake I’m making this weekend
Hi Lindsay, Thank you so much for sharing!!! God bless you!! Kisses from Brazil!
This is Brilliant. I have a book cake on which I wanted to print “Shakespeare”. this is such a brilliant and easy way to do it. Thanks.
great tutorials easy to follow you make it look easy to do I ‘am retired and need something to occupy time think I can sit at table and work on them,just hope I can do half as good as you. Appreciate you give of your time to help others you will be rewarded with lots of crowns I’m sure THANKS
Wow, thank you so much for sharing this and many others.
Great tutorial – I’ve been dying to figure out how to write like that – love it and am so excited to try it!
Thanks Melissa! I hope the method works well for you! 🙂
This is exactly what I was looking for. I need to transfer signatures to a cake and hadn’t quite figured out how to do it. Thank you!!!!!!!!
Great! I hope it works out!
Hey Can you upload the pics again? For some reason I can’t see any of your examples on this page. I’ve checked your other tutorials and can see them fine.
Sorry about that. I’ve fixed it. Thanks for letting me know!
I have a Tiffany & Co gift box cake to make tomorrow, and wasn’t sure how I was going to free-hand “Tiffany & Co” on the cake. You really only get one chance to do it right! Thank you, so much for sharing
You are welcome! This method should work great! Good luck with your cake!
Great tutorial, thanks for sharing! =)