This post may contain affiliate sales links. Please read my disclosure policy.
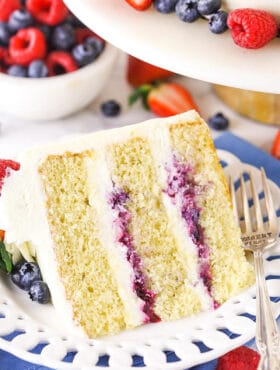
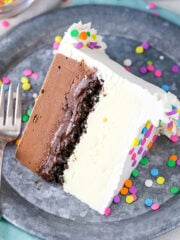
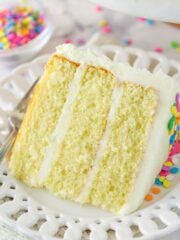
Decorated with fresh fruit, this Berry Chantilly Cake is a flavorful twist on the classic vanilla layer cake. This light and moist vanilla cake is layered with a mixed berry filling and homemade Chantilly cream!

Easy Homemade Chantilly Cake with Berries
This fruity vanilla cake is adapted from my popular Moist Vanilla Layer Cake Recipe. It’s filled with a sweet and delicious berry filling, and the Chantilly cream is made with mascarpone cheese and cream cheese. It’s so creamy and decadent!
This is the perfect cake to make if you want something light and summery! It’s also great if you’re new to decorating sweets. All you have to do is throw on some fresh berries, and boom – you have a beautifully decorated cake for a birthday or special occasion.

What Is Chantilly Cake?
Chantilly cakes may sound fancy, but they’re actually just regular cakes that are filled or frosted with Chantilly cream.
What is Chantilly cream you ask? Essentially, Chantilly cream is whipped cream that’s been sweetened. In this cake it also uses mascarpone cheese for extra creaminess and flavor. The cream is often layered throughout the cake, which is exactly the case for this version. But this cake takes it a step further by featuring a zesty berry filling as well. Perfection!
Now if you’re like me, you’re thinking, “but that’s how I’ve always made whipped cream.” It’s true. My Whipped Cream Recipe uses powdered sugar and vanilla extract. The powdered sugar keeps the whipped cream from wilting and the vanilla extract gives it flavor. So for me, whipped cream and Chantilly cream are synonymous.
Given that I always make my whipped cream this way, I actually have plenty of cakes that could be considered Chantilly cakes. In fact, if you’d like a lemon flavored Chantilly cake, be sure to check out my Lemon Mascarpone Layer Cake.

Recipe Ingredients
The cake, the berry filling and the Chantilly cream come together with simple, fresh ingredients. Here’s what you’ll need for each:
For the Vanilla Cake
- All-Purpose Flour
- Baking Powder: Not baking soda.
- Salt: If you only have salted butter on hand, just leave out the salt the recipe calls for.
- Unsalted Butter: Room temperature.
- Vegetable Oil
- Sugar
- Vanilla Extract: Be sure to use pure vanilla extract.
- Large Eggs
- Milk
For the Berry Filling
- Sugar
- Cornstarch: To thicken the mixture.
- Water
- Lemon Juice: Use fresh lemon juice.
- Strawberries
- Blueberries
- Raspberries
For the Chantilly Cream
- Mascarpone Cheese: It should be cool, but not cold.
- Cream Cheese: At room temperature.
- Heavy Whipping Cream: It should be cold.
- Powdered Sugar: It both flavors the whipped cream and keeps it from wilting.
- Vanilla Extract: Chantilly cream is known for its sweet vanilla taste, so pure vanilla extract is a must for this frosting!
- Fresh Berries: For decorating.

How to Make This Berry Chantilly Cake
This cake is really easy to prepare, especially if you’re used to making layer cakes. There are a few extra steps for putting the layers together, but the result is a perfectly portioned dessert that hits all the right notes when it comes to flavor!
- Prep for Baking: Prepare three 8-inch cake pans with parchment paper circles in the bottom and grease the sides. Preheat the oven to 350°F.
- Combine Dry Ingredients: Combine the flour, baking powder and salt in a medium-sized bowl and set aside.
- Cream Butter, Sugar, Oil & Vanilla: Add the butter, oil, sugar and vanilla extract to a large mixer bowl and beat together until light in color and fluffy, about 2 minutes. You should visibly see a change in color and texture.
- Add Eggs: Add the eggs one at a time, mixing until mostly combined after each. Scrape down the sides of the bowl as needed to be sure all ingredients are well incorporated.
- Combine Wet & Dry Ingredients: Add half of the dry ingredients to the batter and mix until mostly combined. Then, slowly add the milk and mix until well combined. Finally, add the remaining dry ingredients and mix until well combined and smooth. Scrape down the sides of the bowl as needed to be sure all ingredients are well incorporated. Do not overmix the batter.
- Bake: Divide the batter evenly between the cakes pans and bake for 22-25 minutes, or until a toothpick comes out with a few crumbs. Avoid overbaking this cake.
- Let Cool: Remove the cakes from the oven and allow them to cool for about 2-3 minutes, then transfer them to cooling racks to cool completely.
- Make Berry Filling Base: Combine the sugar, cornstarch, water and lemon juice in a medium-sized saucepan over medium heat and stir to combine. Heat until the mixture is wet and the sugar begins to melt.
- Add Berries: Add the berries and stir to coat with the sugar mixture.
- Continue Cooking: Continue to cook until the berries start to soften and let out juice. Use your spatula to mash the berries a bit.
- Remove From Heat & Chill: Remove the berry filling from the heat when the juices have begun to thicken, after about 3-4 minutes. Pour the mixture into another bowl and refrigerate until cool.
- Whip Cheeses for Chantilly Cream: Add the mascarpone cheese and cream cheese to a large mixer bowl and whip just until smooth. Don’t overmix, or you’ll thin out your mascarpone cheese and make it watery.
- Slowly Add Heavy Whipping Cream: Add a small amount of heavy whipping cream at a time (starting with a few tablespoons and slowly adding more at a time) and mix with your whisk attachment on medium speed to incorporate the cream with the cheeses. Continue adding the cream and mixing until all the cream is added. You want to be sure to do this slowly and in small amounts at a time so that your cream mixture doesn’t end up lumpy.
- Add Sweeteners: Once all is combined, add the powdered sugar and vanilla extract. Turn the speed to high and whip until it reaches stiff peaks.
- Assemble Cake: To put the cake together, each layer must be completely cooled. Place the first cake on a serving plate or a cardboard cake round. Pipe a dam of whipped cream around the outer edge of the cake and fill it with half of the berry filling. Pipe a layer of whipped cream on top of the berry filling and spread evenly. Top with the second layer of cake and another layer of berry filling and whipped cream.
- Add Final Layer & Fresh Berries: Add the final layer of cake on top and frost the cake with the remaining whipped cream. Use any remaining whipped cream to pipe swirls on top of the cake. Finish off the cake with some fresh berries.
- Serve or Store: Store the cake in the fridge until you’re ready to serve it.

Tips for Success
Even though this cake recipe is super simple, it does take a little time to put everything together. These tips will help the process go smoothly!
- Level the Cakes for Easy Layering: I recommend using a large serrated knife to remove the domes from the top of the cakes so that they’re flat. These cakes don’t have a large dome, but I like to make sure they’re completely flat for layering purposes. I have a handy tutorial to show you how to do this: How to Level and Torte a Cake.
- Don’t Skimp on the Creaming Time: Make sure you fully cream the butter, sugar, oil and vanilla for your cake batter. The mixture is ready when the color lightens and texture gets fluffy and light.
- Add Heavy Whipping Cream Slowly: When you’re making Chantilly cream, you want to be sure you’re adding the whipped cream in small amounts, a little bit at a time. This prevents the mixture from developing lumps and keeps the texture smooth and creamy.

How to Store Chantilly Cake
This Chantilly cake lasts in the fridge for up to 3 days, if stored in an airtight container. If you’d like, you can make the cake layers a day in advance, let them cool and store them in an air tight container or wrap each one in plastic wrap and store them in the fridge overnight. You can also make the filling in advance. When you’re ready to serve, make the cream, assemble and enjoy!
More Cake Recipes to Try
Want some more yummy homemade cakes to try? You have to check out these delicious recipes!
Strawberry Crunchy Layer Cake
Lemon Blueberry Layer Cake
Homemade Strawberry Cake
Raspberry Dream Cake
Strawberry Shortcake Cake
Blueberry Crumble Layer Cake
Berry Chantilly Cake
- Prep Time: 1 hour
- Cook Time: 35 minutes
- Total Time: 1 hour 35 minutes
- Yield: 13
- Category: Dessert
- Method: Oven
- Cuisine: American
Description
This light and moist vanilla cake is layered with a mixed berry filling and homemade Chantilly cream! Decorated with fresh fruit, this Berry Chantilly Cake is a flavorful twist on the classic vanilla layer cake.
Ingredients
For the Vanilla Cake
- 2 1/2 cups (325g) all purpose flour
- 2 1/2 tsp baking powder
- 1/2 tsp salt
- 3/4 cup (168g) unsalted butter, room temperature
- 3 tbsp vegetable oil
- 1 1/2 cups (310g) sugar
- 1 tbsp vanilla extract
- 4 large eggs
- 1 1/4 cups (300ml) milk
For the Berry Filling
- 6 tbsp (78g) sugar
- 1 1/2 tbsp cornstarch
- 1 tbsp water
- 1 tbsp fresh lemon juice
- 1 1/4 cup (167g) chopped strawberries
- 1 cup (148g) blueberries
- 3/4 cup (84g) raspberries
For the Chantilly Cream
- 10 oz (283g) mascarpone cheese, cool but not cold
- 10 oz (283g) cream cheese, room temperature
- 3 1/4 cups (780ml) heavy whipping cream, cold
- 1 3/4 cups (201g) powdered sugar
- 2 1/4 tsp vanilla extract
- Fresh berries, for decorating
Instructions
- Prepare three 8-inch cake pans with parchment paper circles in the bottom and grease the sides. Preheat oven to 350°F.
- Combine the flour, baking powder and salt in a medium-sized bowl and set aside.
- Add the butter, oil, sugar and vanilla extract to a large mixer bowl and beat together until light in color and fluffy, about 2 minutes. Do not skimp on the creaming time. You should visibly see a change in color and texture.
- Add the eggs one at a time, mixing until mostly combined after each. Scrape down the sides of the bowl as needed to be sure all ingredients are well incorporated.
- Add half of the dry ingredients to the batter and mix until mostly combined.
- Slowly add the milk and mix until well combined.
- Add the remaining dry ingredients and mix until well combined and smooth. Scrape down the sides of the bowl as needed to be sure all ingredients are well incorporated. Do not over mix the batter.
- Divide the batter evenly between the cakes pans and bake for 22-25 minutes, or until a toothpick comes out with a few crumbs.
- Remove the cakes from the oven and allow to cool for about 2-3 minutes, then remove to cooling racks to cool completely.
- To make the berry filling, combine the sugar, cornstarch, water and lemon juice in a medium-sized saucepan over medium heat and stir to combine. Heat until the mixture is wet and the sugar begins to melt.
- Add the berries and stir to coat with the sugar mixture.
- Continue to cook until the berries start to soften and let out juice. Use your spatula to mash the berries a bit.
- Remove from heat when juices have begun to thicken, after about 3-4 minutes. Pour the mixture into another bowl and refrigerate until cool.
- When your cake layers and filling have cooled, it’s time to build the cake. First, make the whipped cream. Add the mascarpone cheese and cream cheese to a large mixer bowl and whip just until smooth. Don’t over mix or it can thin out your mascarpone cheese and make it watery.
- Add a small amount of heavy whipping cream at a time (starting with a few tablespoons and slowly adding more at a time) and mix with your whisk attachment on medium speed to incorporate the cream with the cheeses. Continue adding the cream and mixing until all the cream is added. You want to be sure to do this slowly and in small amounts at a time so that your cream mixture doesn’t end up lumpy.
- Once all is combined, add the powdered sugar and vanilla extract. Turn the speed to high and whip until it reaches stiff peaks.
- To put the cake together, use a large serrated knife to remove the domes from the top of the cakes so that they’re flat. These cakes don’t have a large dome, but I like to make sure they’re completely flat. Place the first cake on a serving plate or a cardboard cake round.
- Pipe a dam of whipped cream around the outer edge of the cake and fill it with half of the berry filling.
- Pipe a layer of whipped cream on top of the berry filling and spread evenly.
- Top with the second layer of cake and another layer of berry filling and whipped cream.
- Add the final layer of cake on top and frost the cake with the remaining whipped cream. Use any remaining whipped cream to pipe swirls on top of the cake. Finish off the cake with some fresh berries.
- Store the cake in the fridge until ready to serve. Cake is best stored in an airtight container and eaten within 2-3 days.
Notes
Makes 12-14 slices.
Nutrition
- Serving Size:
- Calories: 710
- Sugar: 51.1 g
- Sodium: 214.5 mg
- Fat: 43.3 g
- Carbohydrates: 73.1 g
- Protein: 8.6 g
- Cholesterol: 169 mg


Hi!! I am *almost* positive that I used to use this recipe as my vanilla cake base recipe. Has it been updated within the last year or so? I try not to eat butter (dairy issue) and thought that the cake for this recipe used 1/2 a cup of oil and 2 eggs? Just wanted to check- thank you so much!
You are probably thinking of this Berry Mascarpone Cake. It’s slightly different from this one and it uses oil and 2 eggs.
Can I use 10” pan?
As in one 10 inch pan? I haven’t tried it, so it’s hard to say. But I’m thinking maybe.
I already wrote a comment about this cake but it didn’t get published; however, there are significant issues with this recipe and I felt that I needed to try to share my feedback again, as I am absolutely certain that I am not the only one who has experienced this.
First off, let me start by saying thank you for sharing this recipe. Every component of this cake is absolutely delicious – the cake itself, the Chantilly, the berry layer. However, this cake refuses to be a 3-layer cake. The first time I made it, for a friend’s daughter’s birthday, the bottom layer caved as I was assembling the cake. I made the risky decision to flip it over, got rid of the broken layer and was able to assemble the cake as a 2-layer cake (no one noticed a thing). It came out tasty and lovely and was a hit. However, I wasted a third of the cake, and troubleshooting was stressful. I assumed that maybe I had underbaked the layers (they did not look or taste underbaked though). The second time I made the cake was for the 4th of July. This time I didn’t bother with the layers, I baked it as a sheet cake, applied the berry layer, then the Chantilly on top and decorated it with blueberries and strawberries. The cake was a bit dense for a sheet cake, but I understand that it was never intended to be baked that way and it did turn out tasty and was enjoyed by everyone. My third (and final) attempt was yesterday, for my husband’s birthday. This time, I increased the baking time slightly to ensure that I didn’t underbake the layers. Everything came out perfectly. However, as I finished assembling it, the filling started to slip and drip and ooze and slide all over the place while I was working on the final layer. Basically, the layers were too heavy for the Chantilly to hold everything together. The end result – an ugly but delicious mess (which wound up in the trash) and no cake for my husband’s birthday party. I wasted so much time (not to mention money) and the whole thing was so disappointing. The Chantilly was nice, stiff and fully whipped, the layers were baked to perfection and level. The only issue, as I see it, is the heaviness of everything (even the trash bag that I put the whole mess in felt super heavy) and the fact that this recipe does not produce a structurally sound cake.
Delicious cake. Absolutely loved and a perfect summer dessert
I made this recipe for the 4th of July. I loved everything about this cake. It also got rave reviews from others. Thanks for sharing. I will definitely be making this again in the future.
So glad you enjoyed it!
Hi, thank you so much for all of your wonderful recipes! You are my go to for the very best cakes and I have your cookbook also! The Chantilly Berry is a favorite for my family and friends. During the summer, I probably make 2-3 per month for others. How would these do as cupcakes – I love the vanilla cake texture so much, but not sure how they would bake up as cupcakes since they don’t rise a lot. Thank you!
I love this recipe, it came out perfect! I was wondering how can I turn this into cupcakes?
Ok, so I need to start off by saying that this is absolutely one of the BEST cakes I have ever tasted and made. It is simply delicious. The berry layer complements the Chantilly perfectly; the layers are just lovely. The whole thing is creamy and not overly sweet and totally my kind of cake. BUT, I had a MAJOR issue with it. Let me preface by saying that I followed the recipe to a T. I measured everything, timed everything and eyeballed nothing. I made the vanilla layers and the berry filling the night before (refrigerated overnight), and then whipped up the Chantilly and assembled it the day of the party (I was making this for my friend’s daughter’s b-day). As I added the third layer, I noticed, to my complete horror, that the bottom layer had cracked and that the crack was widening by the second, and the cake was about to cave in. I made a panicky decision to flip the whole thing over, removed the cracked bottom layer (which was not at the top) and decorated with the remaining Chantilly. It was beautiful and it tasted great but it ended up being a 2-layer cake. The bottom layer simply wasn’t strong enough to support the weight of two additional layers and filling. Not sure what I could have done differently to make the vanilla cake layers sturdier. All in all, delicious recipe, I’ll definitely experiment with it some more; however the process ended up being much more stressful than I was expecting.
Love love love this frosting recipe! I used it with the sponge of your other berry cake and mascarpone frosting so I am only commenting on the frosting part of this recipe and it’s amazing. I did find it a little tricky because I am not a very good baker but on the second try I feel I nailed it! I whipped the heavy cream first, then I whipped together (very briefly!!) the cheeses. I spooned the cream in like the recipe says but I folded them together before sifting in the sugar and adding the vanilla. I then used my hand held mixer and very very briefly on high whipped it all together. I found doing it this way kept the cream fluffy and airy. 😊
Wonderful! Glad you enjoyed it!
Are the seeds noticeable when eating? . Some berry fillings call for straining. Want to make this cake for sister’s birthday but worried about seeds. Cake sounds delicious.
I agree with Suzy-Q! This is another winner. Such a fresh, decadent, gorgeous dessert that isn’t all that hard to make. I found the instructions for the Chantilly Cream excellent and easy to follow. I had never made Chantilly before but was utterly amazed at how well it turned out. If you enjoy a wonderful cake that isn’t quite as sweet as some, this is a fresh, wonderful combination. Between the sweet and tangy fruit filling and the ultra creamy, yummy cream, it’s a win win! Can’t recommend enough. Great job, Lindsay!
Wonderful! So glad you enjoyed it!
Can i add coffee to the cake and cream?
Also how sturdy is the cream?
I suppose you could add coffee. I’d use instant coffee and dissolve it in the milk/cream. The cream is very sturdy. The powdered sugar and cheeses help keep it stable.
Thanks so much for your prompt response.
Can the cream be left out if the fridge for a couple of hours?
Once on the cake, yes, the cream should be fine sitting out for an hour or two, as long as it’s not in high heat/direct sun.
HELP!! I tried to make the Chantilly Icing TWICE! I ended up with cheese curds both times. Everything was fine until I turned the mixer on high to whip the peaks. I’m not sure if I took too log adding the cream 2 spoons at a time.
As long as everything was smooth and still liquidy after adding the cream, it should whip fine. It may look lumpy-ish, but if you stir it with a spatula, it should be smooth. If not, you could try whipping the cream separately and then folding it into the mascarpone and cream cheese mixture.
I was wondering if that would work. It was too watery to try to whip again. I heated some and poured it over fresh fruit, no one knew I had not planned it. 🙂 I’ll try whipping the cream first. I’m not ready to give up on that cake yet! The chocolate was WONDERFUL!! My new go to from now on.
Thanks.
I always struggle with how much of the frosting to leave for frosting the outside… either I skimp on the filling and have too much outer frosting or I use too much inside and don’t leave enough to frost… any idea how many cups to leave for outside or for the filling so I balance it correctly? Thanks!
I typically use about a cup of frosting for each layer of filling and then use the rest for the outside of the cake.
I can’t wait to make this recipe! Can you use frozen fruit to make the berry mixture?
You never fail to amaze me with your spectacular desserts! Everything I have baked is absolutely delicious. Thank you for inspiring us to present beautiful works of art which dazzle the eyes and satisfy the cravings. I can’t wait to make this wonderful creation!