This post may contain affiliate sales links. Please read my disclosure policy.
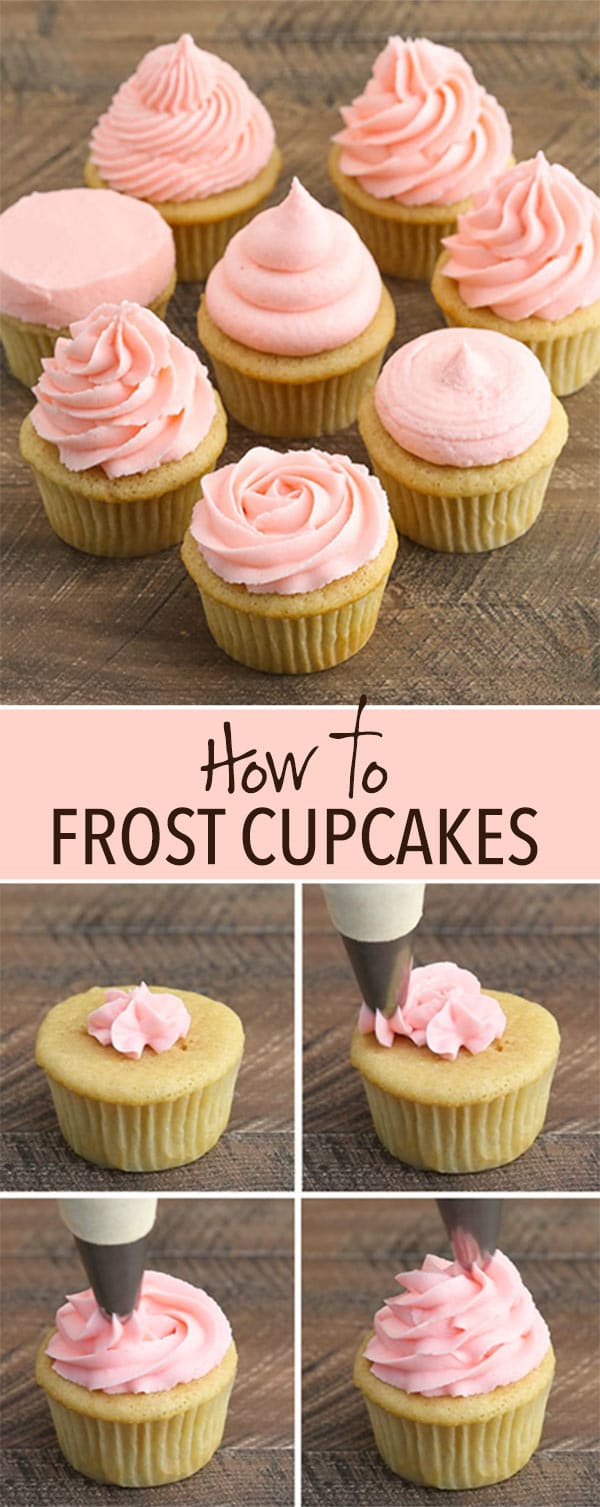
Let’s talk about how to frost your cupcakes! I’ve got a great tutorial and video today to show you nine different ways to frost a cupcake using six different piping tips!
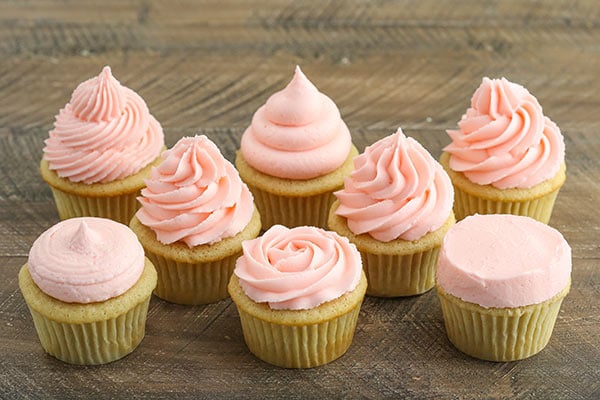
Today’s post has been a long time coming! I’ve got a wonderful post on how to frost a beautifully smooth cake, but until now didn’t have one for cupcakes. I’m so glad to finally fix that!
The first thing to talk about is frosting. I most often use an American Buttercream, but have also used these piping techniques with stabilized whipped cream, meringue frosting and even some with chocolate ganache.
The next thing is that I often hear people say that their frosting is too thick or thin. I’ve got great post on frosting consistency that should be able to answer your questions on how make your frosting so that it’s just right. It’s really all about the balance between the thickness and volume given by the powdered sugar and the amount of butter and milk or water, which soften the frosting.
One you’ve got your frosting ready to go, you’ll need the right tools. Cupcakes are certainly simpler than cakes, so you mainly need your piping bags, piping tips, perhaps an offset spatula and maybe some fun sprinkles. Here are my faves:
Piping Bags
9 inch Offset Spatula
Ateco tip 844
Ateco tip 808
Ateco tip 849
Ateco tip 847
Ateco tip 829
Ateco tip 869
Sprinkles
Next up is frosting the cupcakes! To see how to frost the cupcakes, check out this video below and see the photos and descriptions/directions below. Both should be helpful in seeing the different looks and methods.
WATCH HOW TO DECORATE CUPCAKES
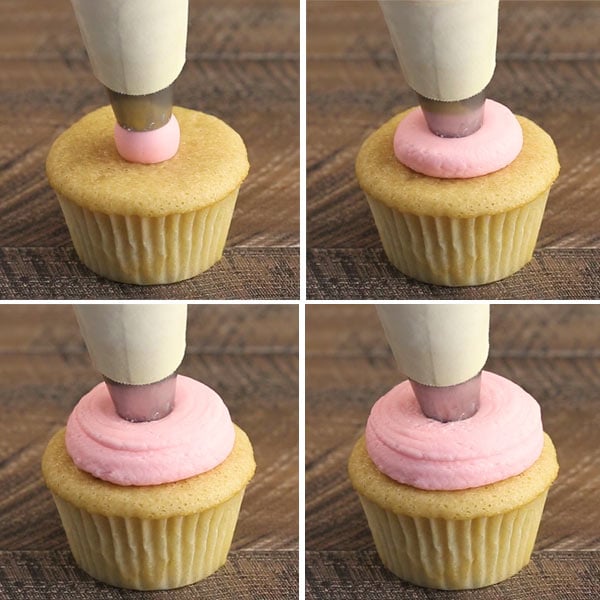
First up is the Ateco tip 844. It’s similar to a Wilton 2D, but the Ateco 844 is bigger and I think it looks better as a result. The first method with this tip is the swirl – my most used cupcake decorating technique and a classic look.
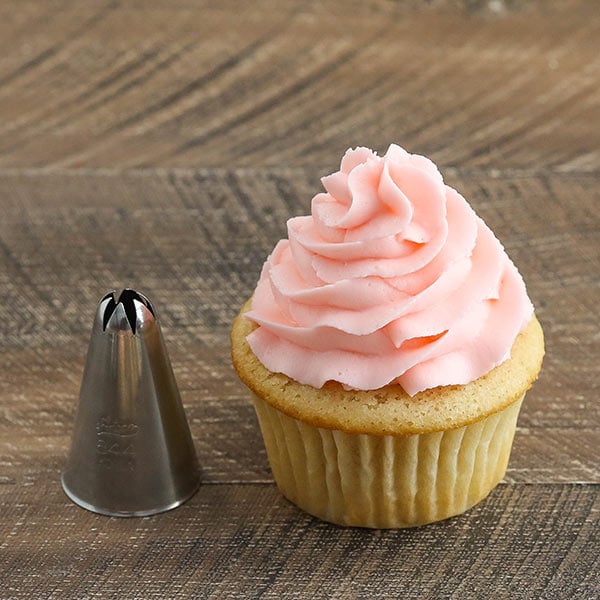
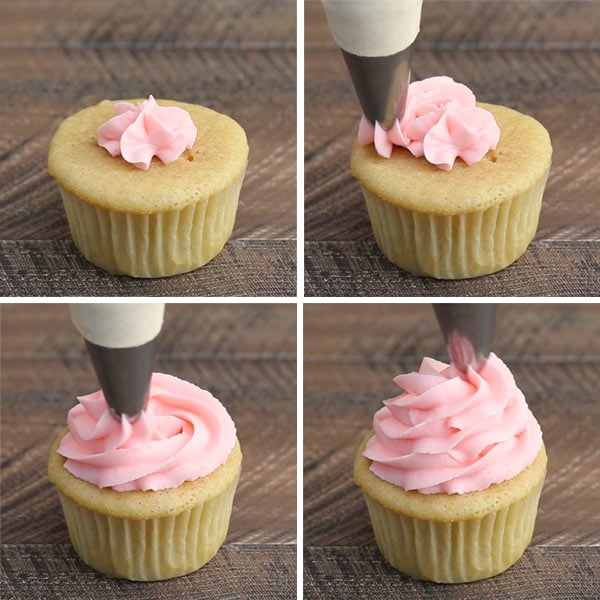
1. To create this look, I start by adding a dollop in the center of the cupcake. Hold the bag perpendicular to the cupcake. Add some pressure to the piping bag and allow a little frosting to come out, then pull up and away and release the pressure. The dollop works as a guide for the next step and helps the frosting on top not collapse in the center.
2. Going around the dollop in the center, start frosting the cupcake around the edge. As you complete a full circle, move the piping bag slightly inward to create the next circle rotation. Continue piping, moving inward for three full rotations, plus a small one on top. Release the pressure and pull the bag away.
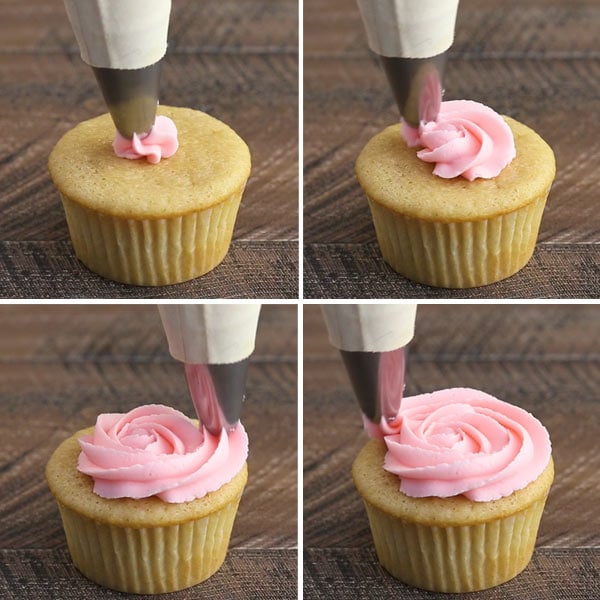
Next up is the rosette method with the same decorating tip – the Ateco 844.
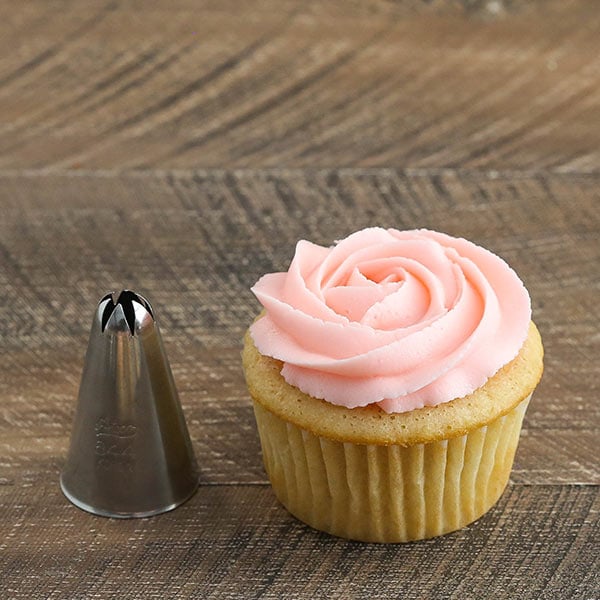
1. To create this look, hold the piping back perpendicular to the cupcake. Start in the center of the cupcake/rose. Begin piping and lift the tip above and around the first drop of frosting and spiral around in a circle.
2. Do as many rotations around as it takes to get to the edge of the cupcake, then release pressure on the piping bag and pull away.
My second favorite piping tip is the Ateco 808 tip. It’s a wonderfully large round tip and I love it. The first method is the swirl.
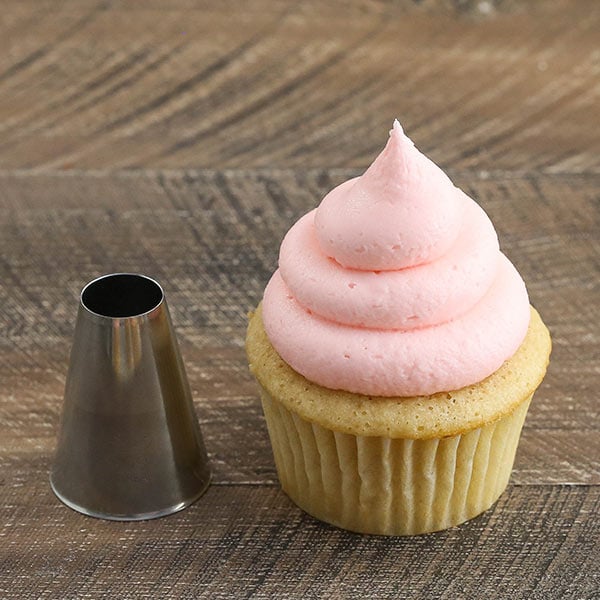
1. To create this look, hold the bag perpendicular to the cupcake. Start at the outer edge of the cupcake and pipe a circle around the outer edge.
2. As you complete a full circle, move the piping bag slightly inward to create the next circle rotation. Continue piping, moving inward for three full rotations, plus a small one on top. Release the pressure and pull the bag away.
There’s no need to add the small dollop in the center for this technique, since the piping tip is so wide.
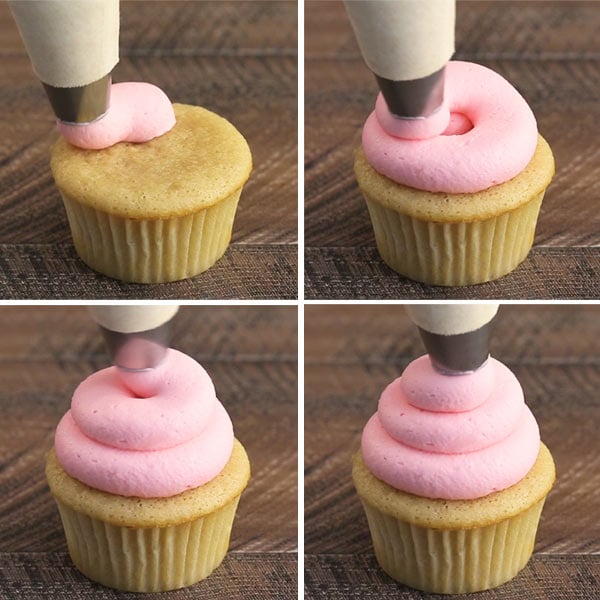
The next method with the same tip is the dome. To create this look, it’s very important to use constant and even pressure on the piping bag to get a smooth look.
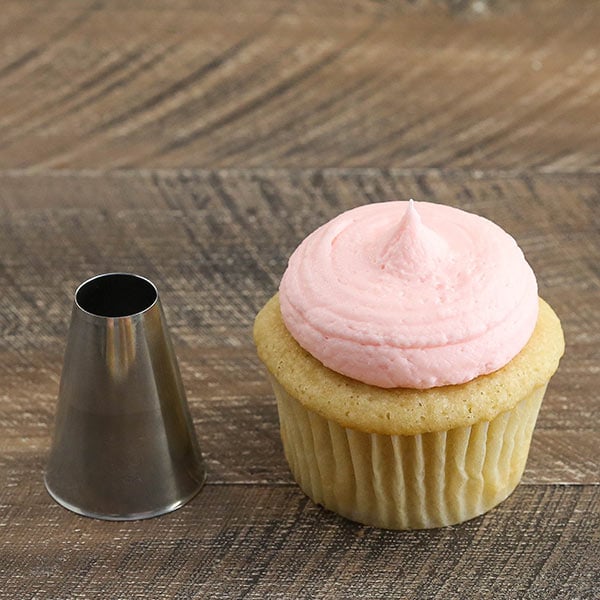
1. Hold your piping bag and tip perpendicular to the top of the cupcake. With the frosting tip about a half inch above the cupcake, squeeze frosting onto the cupcake and allow it to spread outward. Keep the frosting tip in place and slightly buried in the frosting.
2. As the frosting spreads outward and reaches the edge, slowly lift the piping bag to let the dome get a little taller, then release the pressure and lift up.
For the next method, you’ll make a flat top look using the same Ateco 808 tip. It’s a little more of a labor of love, but it’s a nice way to switch up your frosting method. You can decorate the sides of the frosting with sprinkles, chocolate chips or something similar, like I did here.
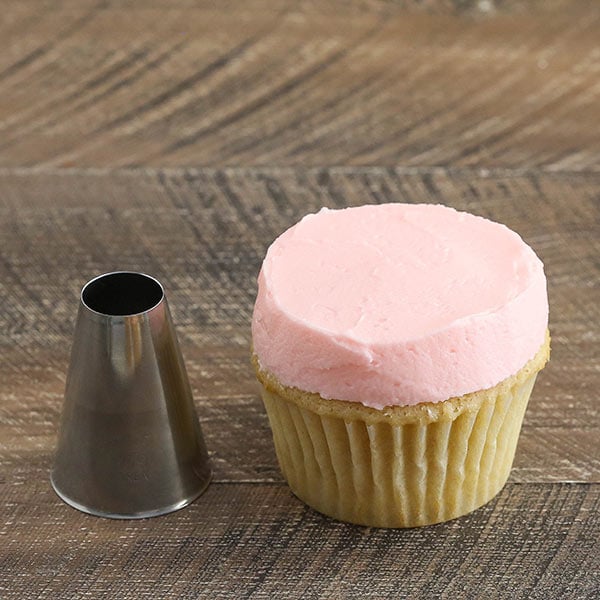
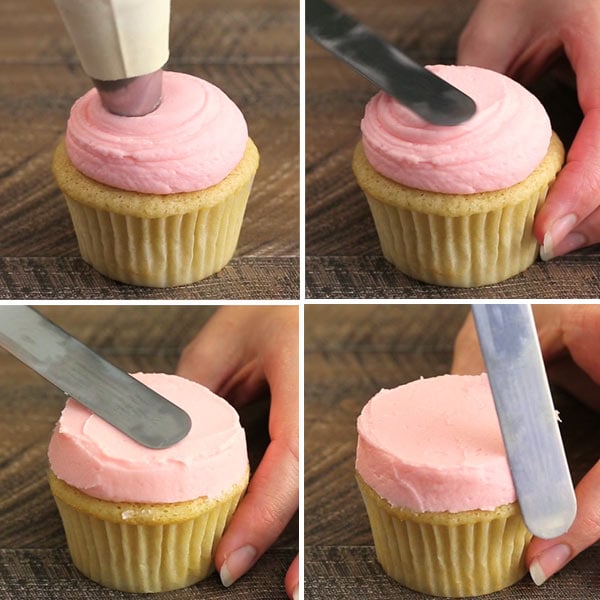
1. To start, use the dome method to pipe some frosting onto the cupcake and spread it around a bit.
2. Use an offset spatula to flatten out the top of the frosting and spread it out towards the edge of the cupcake.
3. Use the offset spatula to straighten and smooth the sides of the frosting mound.
The next several tips are shown with the classic swirl, but they all have a little bit different look based on the tip. They use the same method as the swirls above, but closed star tips all use a small dollop in the center (like the Ateco 844 tip), while the open star tips do not (like the Ateco 808 tip). The open star tips are thick enough that the dollop isn’t necessary.
1. To create these next two looks, start by adding a dollop in the center of the cupcake. Hold the bag perpendicular to the cupcake. Add some pressure to the piping bag and allow a little frosting to come out, then pull up and away and release the pressure. The dollop works as a guide for the next step and helps the frosting on top not collapse in the center.
2. Going around the dollop in the center, start frosting the cupcake around the edge. As you complete a full circle, move the piping bag slightly inward to create the next circle rotation. Continue piping, moving inward for three full rotations, plus a small one on top. Release the pressure and pull the bag away.
To see the photos of the method refer to the two swirls with the frosting tips 844 and 808 above, or watch the video to see these tips in action.
Ateco 847 tip
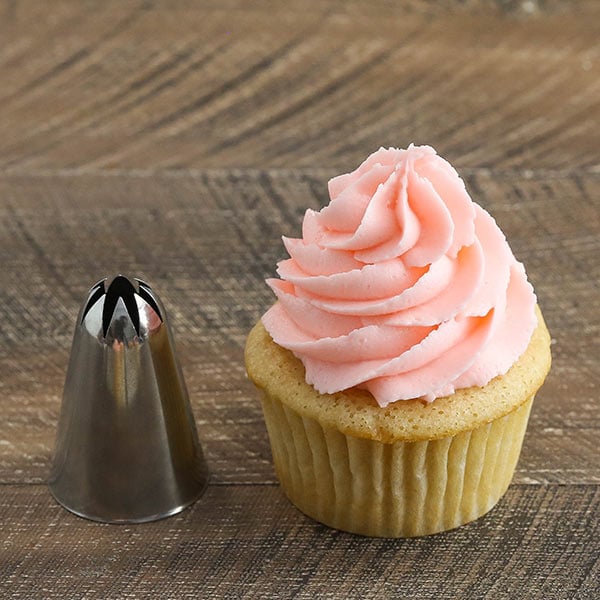
Ateco 849 tip
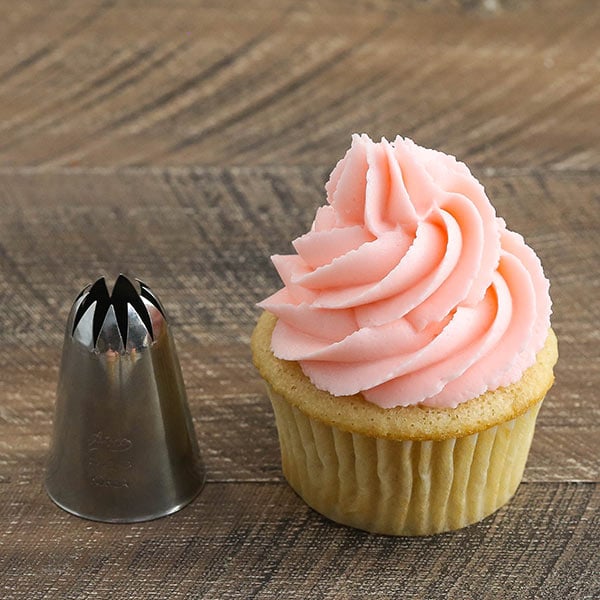
1. To create these next two looks, hold the bag perpendicular to the cupcake. Start at the outer edge of the cupcake and pipe a circle around the outer edge.
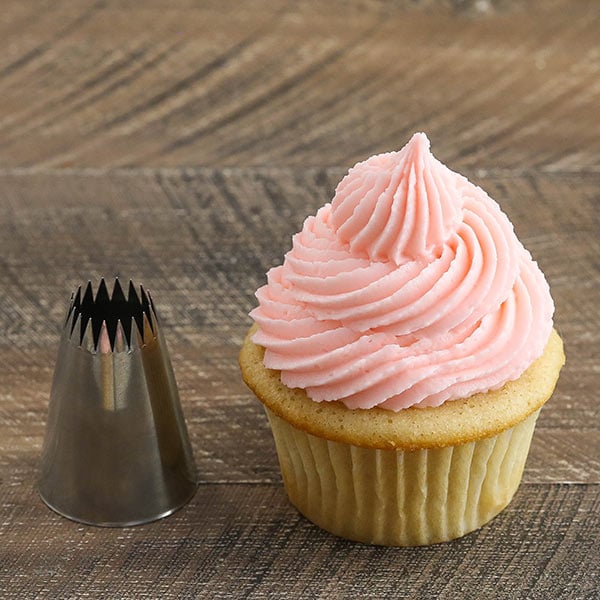
2. As you complete a full circle, move the piping bag slightly inward to create the next circle rotation. Continue piping, moving inward for three full rotations, plus a small one on top. Release the pressure and pull the bag away.
To see the photos of the method refer to the two swirls with the frosting tips 844 and 808 above, or watch the video to see these tips in action.
Ateco 829 tip
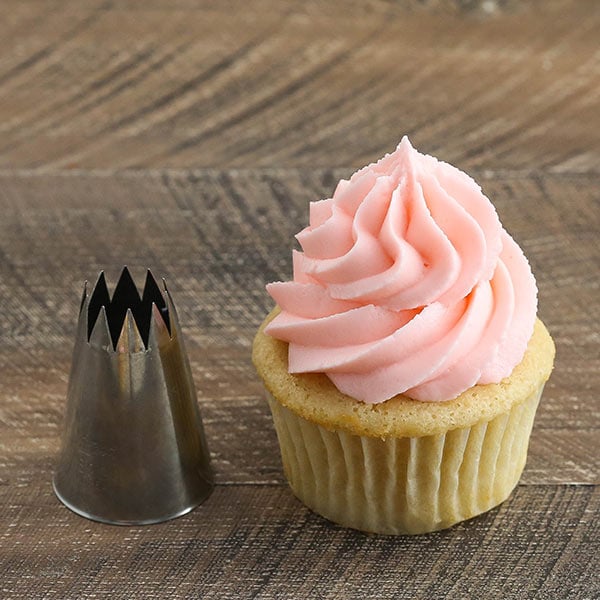
Ateco 869 tip
So there you have it! My most used and favorite methods of frosting cupcakes. I hope you found it to be helpful. A little practice makes perfect, so go on and master your new cupcake frosting techniques!
This post contains affiliate links.





Hi Lindsay. I love this post & video. I live in Australia & am not very familiar with shortening. I have done some research & found the Crisco brand but that is not easy to find here. It looks quite similar in consistency to coconut oil. Do you think I could use this. Also do I need to melt it to add?
Thanks so much
I would just replace it with additional butter.
Thank you for this! My family usually uses knives to frost, so we hardly use these methods. I’m the baker in the family. Last year, I attempted to frost pumpkin cupcakes with store bought cream cheese frosting with the pipe method. I refrigerated the frosting beforehand, and it was hard for it to come out of the pipe, but when it was at room temperature, it was just fine. What happened?
Cold frosting is going to be firm and harder to pipe. Room temperature is always what you should use for piping and frosting.
Wow! Thank you for this post! Now my cupcakes wont look like someone regurgitated cottage cheese onto it! 🙂
Hi Lindsay! Ive recently fell in love with your blog. What kind of tape do you use around the pastry bag/tip?
Thanks Morganne! So glad to hear that! For the pastry bag – I honestly don’t really use anything at the top of the bag to keep it closed anymore – just my hand. But when I do need something for that purpose, I typically use these piping bag ties. I hope that helps!
I am sooooo happy I found your page. I’ve been trying to learn that technique with the round tip and spatula for so long. Cant wait to practice it.
Awesome! I hope it’s helpful!
Hi! Thank you this is great. My mom is trying to perfect cupcake decorations for her business and has an event coming up, so I sent her these. I didn’t see a video. Do you have one that will be helpful for her decorating and for making icing.
There is a video within this post that should be helpful. You can also find my recipe and tips for frosting in this post and this post. I hope that helps!
Where do you find Ateco tips? I’ve only found them online so far.
That’s where I usually get them – online. You can find some at Sur La Table too, but I haven’t been able to find some of the ones I use a lot there.
Most restaurant supply stores that carry baking supplies will carry Ateco products. I buy their piping bags frequently from ACE Restaurant Supply in Houston. Look and see if there is a local supply store near you. They might also be able to order them for you.
I need this! Thank you for this great tutorial! My frosting tips are not from Wilton or Ateco. They’re from Chefast. I bought the set on Amazon. But I think I have the same tips you used, except for the Ateco 829 tip and the Ateco 869 tip. Could you tell me if I could substitute these tips (829 and 869) with Chefast’s tip 14 and tip 17? Thanks!
I’m not able to really find a photo of those tips to see what they look like. I’d use your best judgement as to whether they’re similar or not.
I have a problem with my peanut butter frosting will now stay on my cupcakes..I have waited to frosting them the next day but it still will slide off.after my cupcakes cool off really good I will put then in containers n the next day the top of the cupcakes it’s like real moist.like sticky.,and I’m doing something wrong.i am doing 400 cupcakes for a wedding in October and I’m so scared the pb frosting is going to slide off.. thank you for any help you can give me
Is it sliding off because the cupcake tops are too moist or because the frosting isn’t stiff enough or is too stiff and isn’t sticking? Cupcakes can certainly get a little tacky on top after storing them – it’s from the moisture – but the frosting should slide off because of it.
Hi Lindsey, Every recipe of yours I have made has been beyond delicious. I mean seriously moan and groan worthy! I have a question about the tips you use to decorate your cupcakes. When you use the large Atco tips (808, 844, 869, etc) do you not use a coupler? I tried to use mine and these were way too large. I ended up just putting the tip in the bag and cut a hole in the bottom as I normally would. I have never used such a large tip and I loved how the designs came out but I was just wondering if I’m doing it right without the coupler or should I try to find a coupler large enough to fit those tips? Thanks 🙂
Hi Lisa! I’m so glad you’ve enjoyed them! You are definitely doing it right – I don’t use a coupler either. I know there are some big couplers out there, but a bag with just the tips works fine for me.
Thank you for the tutorial on frosting. It was really helpful for someone just starting out–ME! Would you use the Ateco 844 tip for frosting mini cupcakes, or is it too large?
Sorry for the delay! You can certainly use it for mini cupcakes, you just won’t have as big or as many layers of the swirl.
I need a couple of great frosting recipes
I linked to my vanilla buttercream in the post, but if you’re looking for something else specifically, I can try to see if I have one.
Thanks for this! Could this be used for a cream cheese frosting? I am making red velvet cupcakes for a wedding and I want the frosting to hold its shape and to be a pretty design.
Yes, it can. You just want to be sure the consistency isn’t too thin. I would suggest checking out the frosting I used on these cupcakes.
My question is …. what kind of frosting do you use ? I use the can frosting and it will NOT hold a shape at all .. have tried different brands and they all do the same thing .
Yes, canned frosting is much too thin. You’ll want to make a frosting and make sure to have a thick enough consistency (a post about that here). Here’s the vanilla buttercream used in the tutorial, but also most of the frostings on my site are all thick enough for these techniques.
Absolutely LOVE this post. Thank you!! Hope you have another cookbook out soon. You know – in your spare time!! 🙂
Ha! Maybe one day! Thanks so much Wendy! Glad you found it helpful!
I totally needed this post!! I’m a terrible froster-er. I love that one that is flat on top, very classy! Can’t wait ti try it!