Description
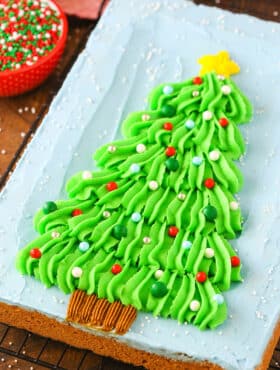
This easy Christmas Tree Chocolate Chip Cookie Cake is made with classic chocolate chip cookie dough in a 9×13 pan! Decorated in vanilla buttercream with a snowy Christmas tree, it’s the perfect addition to your cookie exchange or celebration!
Ingredients
Chocolate Chip Cookie Cake
- 3 cups (390g) all purpose flour
- 1 1/2 tsp baking soda
- 1/2 tsp baking powder
- 1/2 tsp salt
- 3/4 cup unsalted butter, room temperature
- 3/4 cup (168g) packed light brown sugar
- 1/4 cup (52g) sugar
- 3 eggs
- 1 tbsp vanilla extract
- 2 1/4 cups (380g) semi sweet chocolate chips
Vanilla Buttercream
- 3/4 cup (168g) salted butter, room temperature
- 3/4 cup (142g) shortening
- 6 cups (690g) powdered sugar
- 1 1/2 tsp vanilla extract
- 3–4 tbsp water or milk
- Green gel icing color
- Golden yellow gel icing color
- Brown gel icing color
- Blue gel icing color
- Sprinkles or candies
Instructions
To Make the Chocolate Chip Cookie Cake
- Preheat oven to 350°F (176°C). Grease the sides of a 9×13 inch cake pan and place parchment paper in the bottom.
- In a medium sized bowl, combine the flour, baking soda, baking powder and salt.
- In a large mixer bowl, cream the butter and sugars together until light and fluffy, about 3-4 minutes.
- Add the eggs one at a time, mixing just until combined before adding the next.
- Add the vanilla extract and mix until well combined.
- Add the dry ingredients in two batches, mixing until combined. Dough will be thick and sticky.
- Stir in the chocolate chips.
- Press the dough evenly into the cake pan. I use my offset spatula to spread it around in the pan, since it’s sticky.
- Bake for 15-20 minutes or until the top of the cookie is lightly golden.
- Remove from oven and allow to cool completely in the cake pan, then transfer to serving plate and place in the fridge. (I find it helps to refrigerate the cake for about 30-60 minutes at this point to firm it up before removing it from the pan. You can also pop it in the freezer for about 10 minutes. Being cool and firm helps the cake stay together while you remove it from the pan.)
- To remove this from such a large pan, I use a cooling rack and a cardboard cake rectangle (two cooling racks would also work). Place the cooling rack against the top of the cake pan, then flip it over and remove the baking sheet.
- Immediately and quickly place the cardboard cake rectangle on top of the cookie cake (which is the bottom), and flip the whole thing over using the cooling rack.
- Then, remove the cooling rack from the top of the cake.
- When done correctly, the top of the cookie cake will be facing upward and the bottom will be sitting on the cardboard cake rectangle.
To Make the Vanilla Buttercream
- To make the frosting, beat the shortening and butter until smooth.
- Slowly add half of the powdered sugar. Mix until combined and smooth.
- Add the vanilla extract and 3 tablespoons of water or milk and mix until smooth.
- Add the rest of the powdered sugar and mix until smooth. Add more water to get the right frosting consistency.
To Decorate the Cake
- Divide the frosting into 4 bowls – a little less than half in one bowl for green, about 1/4 cup in another bowl for brown and a little less than 1/4 cup in another bowl for yellow. The remaining frosting will all be blue.
- After you’ve colored your frostings, spread a layer of blue frosting over the top of the cake and smooth it out as nice as you can.
- To make the trunk of the tree, pipe 5 small lines at the “base” of what will be the tree. I used piping tip Wilton 32.
- Pipe the green frosting into the shape of a Christmas tree. I used Ateco tip 844. Think of piping a shell border, but with long tails and make the shells side by side. Start with one row of 9 across, then 8, then 7 and so on until the top row is 4 shells across. If you’ve like to practice before adding this to the top of the cake, you can pipe it onto parchment paper and then reuse the frosting to pipe it onto the cake. You could also pipe the tree onto parchment paper, freeze it and then peel off the parchment paper and transfer the buttercream tree onto the cookie.
- Top the tree with a yellow star. I used Wilton tip 21. Again, you could pipe the star right onto the cookie, or onto parchment paper and freeze it.
- Decorate the tree with the sprinkles or candies of your choice. I used sprinkles, but Christmas colored M&Ms would also make a nice option. You can also add sprinkles to the blue frosting to make “snow”, if you’d like.
- Store in an airtight container until ready to serve. Cab be kept on the counter for 24 hours, in the fridge for up to 5 days and in the freezer for up to 3 months.
Nutrition
- Serving Size: 1 Slice
- Calories: 614
- Sugar: 59.7 g
- Sodium: 247.3 mg
- Fat: 32.9 g
- Carbohydrates: 78.4 g
- Protein: 5.4 g
- Cholesterol: 71.7 mg
