This post may contain affiliate sales links. Please read my disclosure policy.
This Chocolate Poke Cake is a chocolate lover’s dream! A decadent chocolate mixture seeps into every nook and cranny of an already supremely moist chocolate cake. The whole thing is topped with fluffy chocolate whipped cream, making it the ultimate chocolate dessert.

Why You’ll Love This Chocolate Poke Cake Recipe
One of the great things about poke cakes is that they are so easy to make. Plus, there are so many fun ways to make them. This one is all about chocolate though and is a go-to recipe for a fabulous dessert.
- So. Much. Chocolate. From the chocolate cake to the chocolate sauce to the chocolate whipped cream topping (and the chocolate sprinkles on top of it all), this dessert is loaded with glorious, rich chocolate flavor.
- Miraculously moist. This cake is so moist! Even before you pour the chocolate mixture over it. With the chocolate mixture, though? It soaks into every bit of the cake, making it supremely ooey-gooey and fabulous.
- A recipe for any skill level. This recipe is so easy to make. The cake itself is super simple and the chocolate sauce and whipped cream topping come together in minutes. All that’s left to do is poke some holes in the cake, pour the sauce over it, and add the whipped cream topping.
What Is Poke Cake?
A poke cake is a simple sheet cake with a spin. Once the cake comes out of the oven, you pokes holes all over the top of the still-warm cake and then drizzle some sort of sweet mixture (in this case, a chocolate mixture) over the top. The sauce seeps into the holes in the cake, infusing it with extra flavor and moisture. Most poke cakes are finished with a whipped cream topping but feel free to experiment with other frosting options.

Recipe Ingredients
Here’s what you’ll need for this chocolate poke cake recipe. The ingredients are pretty straightforward and easy to find. Check out the recipe card below for precise measurements.
Chocolate Cake
- All-purpose flour – I highly suggest using the spoon and level method or a food scale to get the proper amount of flour here. Otherwise, you’ll have a dry, dense cake.
- Sugar
- Natural unsweetened cocoa powder
- Baking soda – For the perfect rise. There’s no baking powder used here.
- Salt – Without a little salt, you’ll have a bland cake.
- Eggs – Be sure to use large eggs, not medium or extra large.
- Milk – I usually use whole milk or 2%.
- Vegetable oil
- Vanilla Extract
- Hot water – The hot water helps the cocoa powder bloom for the biggest chocolate flavor possible.
- Sweetened condensed milk
- Semi-sweet chocolate chips – Milk chocolate chips would also be fine.
Whipped Cream Topping
- Heavy whipping cream – The heavy cream must be cold. If it is too warm, it won’t whip up and hold volume properly.
- Powdered sugar – The powdered sugar works to sweeten the whipped cream as well as to stabilize it.
- Natural unsweetened cocoa powder – You can use Dutch-processed cocoa powder if you’d like an even richer chocolate flavor and darker color.
- Vanilla extract
- Chocolate sprinkles – The chocolate sprinkles are optional but fun. Feel free to use chocolate shavings or mini chocolate chips instead.

How To Make Chocolate Poke Cake
Here’s a brief overview of how to make the moistest chocolate poke cake ever. Be sure to scroll to the recipe card below for more detailed instructions.
- Prep. Grease the bottoms and sides of a 9X13-inch cake pan and preheat the oven to 300°F.
- Make the cake batter. Whisk together the flour, sugar, cocoa powder, baking soda, and salt. Mix in the eggs, milk, vegetable oil, and vanilla, followed by the hot water.


- Bake. Pour the batter into the cake pan and bake for about 40-45 minutes.
- Poke. Remove the cake from the oven and poke holes all over.


- Make the chocolate sauce. Combine the sweetened condensed milk and chocolate chips, microwave for about 30-60 seconds, then whisk until smooth.


- Soak the cake. Immediately spread the sauce over the cake.
- Chill. Allow the cake to cool completely in the fridge.


- Make the whipped cream topping. Whip together the heavy cream, powdered sugar, cocoa powder, and vanilla until stiff peaks form.
- Put it all together. Spread the whipped cream over the cake and top with chocolate shavings.

Tips & Tricks
Striving for greatness? Take a look at these pro tips from my kitchen to yours. They’ll help you achieve the best results possible.
- Measure the flour accurately. Too much flour can give you a dry, dense cake. So make sure to measure it correctly using a food scale or the spoon and level method. Check out my post on How to Measure Flour for more information
- Don’t over-mix. When combining the wet and dry ingredients for the cake batter, mix just until everything is incorporated. No more. Over-mixing can cause the glutens in the flour to over-develop, giving you an overly dense cake.
- Hot water. The water used in the cake batter should be hot. The heat helps the chocolate in the cocoa powder bloom, giving you the best chocolate flavor possible.
- Work quickly. You want to pour the chocolate sauce over the cake while the cake and the sauce are still warm. If the sauce cools too much, it will thicken and won’t seep into the holes as well. Additionally, the flavors of the sauce will seep into the cake more effectively if the cake is still warm.
- Cold heavy cream. The heavy cream for the whipped cream topping must be cold. If it is too warm, it won’t whip up and hold volume properly and you’ll end up with a runny whipped cream.
- Allow the cake to cool. Before adding the whipped cream topping, allow the poke cake to cool completely. Otherwise, the chocolate whipped cream won’t sit on top of the cake properly.

Proper Storage
- Refrigerator. Leave the cake in the baking dish and cover it tightly with a double layer of plastic wrap or a layer of foil. You can store the leftovers in the fridge for up to 5 days.
- Freezer. Wrap the poke cake in a double layer of plastic wrap (leave it in the baking dish) and store it in the freezer for up to 3 months. Allow the leftovers to thaw in the fridge before diving back in.
More Poke Cake Recipes To Try
- Chocolate Turtle Poke Cake
- Baileys Chocolate Poke Cake
- Lemon Poke Cake
- Strawberry Poke Cake
- Red Wine Chocolate Poke Cake
- Oreo Chocolate Poke Cake
Watch How To Make It
This recipe was updated 7/16/24. For the old version, download the PDF of the recipe. The new version uses a homemade cake, rather than a cake mix.
Print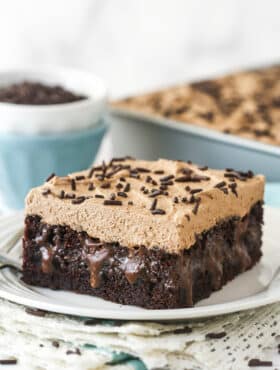
Chocolate Poke Cake
- Prep Time: 30 minutes
- Cook Time: 45 minutes
- Total Time: 1 hour 15 minutes
- Yield: 12-15 Servings
- Category: Dessert
- Method: Oven
- Cuisine: American
Description
This Chocolate Poke Cake is a chocolate lover’s dream! A decadent chocolate mixture seeps into every nook and cranny of an already supremely moist chocolate cake. The whole thing is topped with fluffy chocolate whipped cream, making it the ultimate chocolate dessert.
Ingredients
Chocolate Cake
- 2 cups (260g) all-purpose flour (measured correctly)
- 2 cups (414g) sugar
- 3/4 cup (85g) natural unsweetened cocoa powder
- 2 tsp baking soda
- 1 tsp salt
- 2 large eggs
- 1 cup (240ml) milk
- 1 cup (240ml) vegetable oil
- 1 1/2 tsp vanilla
- 1 cup (240ml) hot water
- 14 oz sweetened condensed milk
- 1 cup (169g) semi-sweet chocolate chips
Whipped Cream Topping
- 2 cups (480) heavy whipping cream, cold
- 3/4 cup (86g) powdered sugar
- 1/4 cup (29g) natural unsweetened cocoa powder
- 1/2 tsp vanilla extract
- Chocolate sprinkles, optional
Instructions
- Prepare a 9×13-inch cake pan by greasing the bottom and sides. Preheat oven to 300°F (148°C).
- Combine the flour, sugar, cocoa powder, baking soda and salt in a large bowl.
- Add eggs, milk, vegetable oil and vanilla extract to the dry ingredients and whisk together until well combined. Don’t over mix.
- Add the hot water and whisk together until well combined. Don’t over mix. Batter will be very thin.
- Pour the batter into the cake pan and bake for about 40-45 minutes, or until a toothpick comes out with a few moist crumbs.
- Remove the cake from the oven and poke holes all over. I use a knife sharpening rod, but you could also use a straw or the end of a wooden spatula.
- While the cake is still warm, add the sweetened condensed milk and chocolate chips to a microwave safe bowl. Microwave for about 30 seconds to 1 minute.
- Whisk the chocolate mixture until smooth, then immediately pour over the cake, spreading it over and into the holes. Don’t let the mixture sit before pouring it over the cake or it’ll start to thicken and not soak in the holes as well.
- Set the cake in the fridge to cool and soak.
- When the cake has cooled, add the ingredients for the whipped cream topping to a large mixer bowl. Whip on high speed until stiff peaks form.
- Spread the whipped cream evenly over the cake. Top with chocolate shavings, if desired.
- Refrigerate until ready to serve. Cake is best if eaten within 4-5 days.
Nutrition
- Serving Size: 1 Slice
- Calories: 556
- Sugar: 56.9 g
- Sodium: 379.7 mg
- Fat: 28.5 g
- Carbohydrates: 74 g
- Protein: 7.8 g
- Cholesterol: 52.2 mg


Absolutely delicious. The whipped cream topping is amazing. I added a tsp. of expresso powder into whipped cream and it was so good. Great recipe and easy to make.
Wonderful! I’m so glad you enjoyed it!
Can you make the cake the day before and then the next day make the condensed milk and chocolate chip melt and put it over The cooled cake with the holes or does it have to be done when the cake Comes out of the oven
The mixture does a better job of soaking in when the cake is warm, so I would recommend that. You could do it the next day though, it just may not soak in quite as well.
I tried this recipe and it came out so good! It was extremely delicious and it all went together so well! For the cake part, I used your “The Best Chocolate Cake Recipe” and it was a hit! Definitely will be making this again!!
Hi tried this cake and found the drizzle too thick to go down in the cake, most stayed on top. Wasn’t as moist as should’ve been.
I made this twice and both times people were raving about it. It’s delicious!
I just wanted to tell you I have made this cake for years. It is delicious and gets requested often in my house. Thank you!
Glad to hear that!
is this recipe nut free? i want to make this for a friend but she has a nut allergy to all nuts!
There are no actual nuts in the recipe, but you may want to check the packaging of the particular ingredients you use to be sure. Not all things are made in nut free facilities.
Can this be made as a regular layered cake? IE layers of cake stacked on top of each other
I haven’t tried it. The layers are pretty moist after you put the filling on them so I’m not sure if it’s really ideal or not.
Has anyone ever tried to freeze this cake before adding the topping? I’d like to try this!! Thoughts??
I have made this cake before and love it, but this time I was in a rush. I dont think I let the chocolate chips and condensed milk melt enough, because the chocolate has hardened on top of the cake. I dont remember that from the other times I made it. Does this seem right?
This cake is absolutely AMAZING. and I’m not a cake person. Wow. Will be making this again!
Made this for my daughters birthday and it turned out delicious. My 2 grandchildren asked for seconds. Thank you for this recipe.
I made this for a recent going away party of 3 coworkers. Since I’m the “dessert” person, they asked for chocolate. I searched for the most “chocolatey” (if that’s a word!) recipe I could find. And this was IT!!! All I can say is OMG! Everyone loved it! After putting on the whipped topping, I drizzled on chocolate and caramel ice cream topping and instead of the chocolate pieces, I sprinkled crushed toffee bits.
I made this in a 12×17” pan (2batches!) and it turned out delicious! My only take away is that although I kept the dessert in the refrigerator all night before work, by lunchtime when out if the fridge, the topping was super soft & a little runny. It didn’t change the taste of the dessert any, but it was messy. So I’d keep it in the fridge until close to serving time! Definitively recommend for choc-o-holics!!!
Just wondering if one can use Hershey’s syrup in place of the chocolate sauce?
I would probably go with the sauce over a syrup just because I think the syrup is usually fairly thin. But that’s up to you.
Made this cake today for dinner with friends. I read all the raving reviews and was skeptical that it could be THAT GOOD. Buuuuuut I really liked it haha! So did my guests and I found myself wanting to grab seconds like all the kids did! I’m glad I got to take home the 3 extra pieces! Will definitely make again. P.S. my husband RARELY eats dessert and enjoys it. When he saw me writing this review he said “I’m going to go have a second piece of that cake.”!!!!!!
Easy to make, and so yummy. Cut small pieces to serve, as this is an extremely rich dessert. I did not add the chocolate sauce, and mini bits on the top. It didn’t need it.